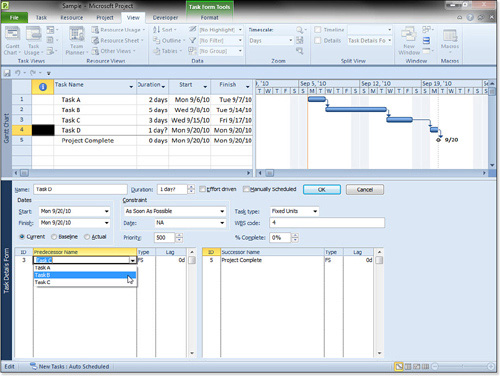
Creating Links by Using the Entry Table
You can create or edit dependency relationships in the Predecessors field on the Entry table (see Figure 9).
The Entry table is the default table displayed in the Gantt Chart view.
To see the Predecessors fields on the table, either move the vertical
split bar to the right, or click the right arrow on the horizontal
scroll bar at the bottom-left side of the Gantt Chart view.
Tip
One of the most commonly used
methods for creating predecessor/successor link relationships is by
using the Entry table. Furthermore, you can add the
Predecessor/Successor column to any table view by selecting a column in
the table, clicking Insert Column, and then selecting either Successors
or Predecessors. |
You can enter the simplest relationship,
Finish-to-Start, by just entering the task ID number for the
predecessor task in the Predecessors field (or the ID for the successor
in the Successors field). The other dependency relationships require a
very specific pattern of coding.
Assume that you want to make the Pack Rooms task a
predecessor with a Start-to-Start link and a one-day lead. The code in
the Predecessors column would be 10SS-1d. The explanation for the code
is as follows:
Enter the ID number for the predecessor first (in this case, 10).
Note
You can add the Successors field to the table and edit both predecessors and successors for tasks in the table. |
Follow
the ID number without any spaces by the abbreviation for the type of
link (in this case, SS). If the link is the default FS, you usually do
not have to include the abbreviation, except when you want to add a lag
or lead. You must add the abbreviation in order to add a lag or lead.
Tip
If you do not remember the ID
number of the predecessor, leave the cell you are editing selected
while you scroll through the task list to find the predecessor task. Do
not select the predecessor; just view its ID number. As you start
typing, the row for the cell you are editing returns to the screen, and
you can finish the link definition. |
Optionally,
you can follow the link type with a plus sign (+) for a lag or a minus
sign (−) for a lead. You cannot omit the plus sign with a lag.
Follow
the plus or minus sign with the length of the lag or lead, using
duration units (that is, m, h, d, w, or mo), elapsed duration units
(that is, em, eh, ed, ew, or emo), or a percentage sign (%). If the
current example had a two-day lag, the code would be 10SS+2d. If the
lag were two elapsed days, the code would be 10SS+2ed. If a lead were
10%, the code would be 10SS−10%.
If a task has more than one predecessor, you
separate the predecessor definitions with commas without any spaces.
For example, the code 5SS−2d,6,3FS+1d would link the current task to
tasks 5, 6, and 3.
Note
You form codes for the
Successors field identically to the way you form codes for the
Predecessors field. The only difference is that you begin with the ID
number for the successor instead of the predecessor. |
