Creating Links by Using the Mouse
You can use the mouse to link taskbars on the
timescale side of the Gantt Chart view, in the Network Diagram view, or
in the Calendar view. You can also use the mouse to edit the linking
relationship in the Gantt Chart view or the Network Diagram view.
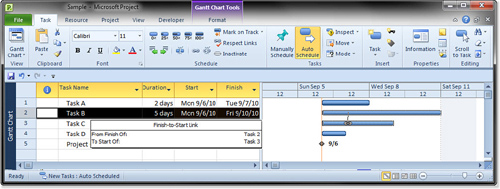
To link tasks with the mouse in the Gantt Chart
view, center the mouse over the predecessor task until the pointer
changes into a four-arrow icon. Then click and drag the pointer (which
should then turn into a linked-chain icon) over the center of the
successor task. Hold the mouse button until Project interprets your
action as creating a link. The pointer changes into a linked-chain
icon, and displays the Finish-to-Start Link information box (see Figure 10).
Caution
The mouse pointer is designed
to perform a number of actions on tasks, so be careful when creating
links by using the mouse. It is easy to accidentally move the task or
mark the task as being partially complete. You must watch the shape of
the mouse pointer carefully to ensure that you are doing exactly what
you intend to do. |
Using the mouse for linking is the most convenient
when you can see both tasks you are trying to link onscreen at the same
time. If only one taskbar is visible, you have to drag offscreen, and
Project begins rapidly scrolling the tasks. You can probably do better
with one of the other methods of linking the tasks, as described
earlier in this chapter, such as selecting the two tasks (select the
predecessor first) and using the Link Tasks tool.
Tip
If you start using the mouse
to link tasks and then want to cancel the linking procedure, simply
drag the mouse up to the menu or toolbar area of the Gantt Chart view
or the Calendar view and release the button. In the Network Diagram
view, you must return the mouse to the task you started with before
releasing the mouse button, or you will create a new successor task. |
Note
In the Network Diagram and Calendar views, you must drag from the center
of the predecessor task’s box or taskbar, and the pointer is the plain
white cross, not the four-arrow shape you look for in the Gantt Chart
view. In those views, the four-arrow shape appears when the pointer is
over the border of the task box or taskbar, and means that you will
move the task if you drag the border. In all cases, make sure that the
mouse pointer is the linked-chain shape when you are over the successor
task before you release the mouse button. |
The dependency type created with the mouse is always
a Finish-to-Start relationship. You can change the link type, add a lag
or lead, or delete the link by displaying the Task Dependency dialog
box with the mouse in the Gantt Chart or Network Diagram view.
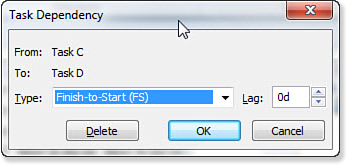
To display the Task Dependency dialog box, scroll to
display any portion of the linking line between the predecessor and
successor tasks. Position the tip of the mouse pointer on the line
connecting the tasks whose links you want to edit. A ScreenTip should
appear, with the details of the link. Double-click the linking line,
and the Task Dependency dialog box appears, as shown in Figure 11.
The From task in the dialog box is the predecessor, and the To task is
the successor. You can change the dependency type with the drop-down
list in the Type field. Choosing None removes the link, as does
clicking the Delete button. You can redefine the lag or lead in the Lag
field. Click the OK button to complete the change.
Note
You cannot change the
names of the linked tasks in the Task Dependency dialog box, nor can
you change which task is the predecessor and which is the successor. |
Working with Automatic Linking Options
If you use only simple Finish-to-Start links in a
project, Project’s Autolink feature (which is enabled by default) can
help you maintain the dependency link sequences when you move, delete,
or insert tasks within a linked sequence of tasks. However, Autolink
works only if the affected links are Finish-to-Start links, and are in
the middle of the linked sequence (Autolink does not apply to the first
or last task in a linked sequence).
When you change the order of tasks, and thus their
ID numbers, in a task table (such as the one in the Gantt Chart view),
you create a break in the link sequence chain. Autolink repairs the
break in the following ways:
If you cut or delete a task from within a
chain of Finish-to-Start linked tasks, Autolink repairs the break in
the chain by linking together the former predecessor and successor of
the deleted task. In essence, it mends the gap created in the chain by
the deletion.
If you insert a task in a
chain of Finish-to-Start linked tasks, Autolink breaks the former link
between the tasks. The new task is inserted between the existing tasks,
and then the newly inserted task is linked to the task above and below
it to keep the linked sequence intact.
If
you move a task from one Finish-to-Start sequence to another, Autolink
repairs the chain at the task’s old site and inserts the new task into
the chain at the new site.
In the Network Diagram and Calendar views, Autolink
behaves this way only when you delete a task or insert a new task,
because you cannot cut, copy, or move tasks to a different ID order in
those views.
Note
If you insert or remove a task
from the beginning or end of a linked chain, instead of in the middle
of the chain, Autolink does not include the new task in the chain.
Inserting a task at the beginning of a series of linked tasks, or after
the last task in a linked sequence, does not cause Autolink to extend
the chain to include the new task. To include a
task in a sequence, when the task has been added either to the
beginning or end of the sequence, you must link the tasks yourself,
using one of the previously discussed methods. |
By default, Autolink is enabled, but you can disable
it by changing the status of the Autolink option. Select the File tab,
Options, Schedule. Clear the Autolink inserted or moved tasks check
box. To set the option status as a default for all new projects, choose
All New Projects from the Scheduling Options for This Project
drop-down. Otherwise, the change you make affects only the active
project document.
Tip
If you have disabled Autolink
and need to insert or paste tasks into a Finish-to-Start sequence, you
can quickly reestablish the sequence to include new tasks. Select the
tasks, starting with the row above the insertion and including the row
below the insertion, and use the Unlink Tasks tool to break the
original link. Then, with the tasks still selected, use the Link Tasks
tool to include the new tasks in the sequence. If there was a lead or
lag included in the old link, you need to decide which of the new links
should include it. If you delete or cut tasks
from a Finish-to-Start sequence, select the rows above and below the
deleted rows and click the Link Tasks tool. |
Caution
As convenient as Autolink can
be when editing a simple task list, it can cause problems in large or
complex projects by creating unintended task links when you insert
tasks. You should double-check the links to ensure that they are as you
intended for the project. Unintended task links can become a
troublesome problem in a project schedule. If
automatic linking is enabled and you rearrange an outline, you should
carefully review the links that result each time you move a task or
group of tasks in the outline. You might have to edit the links to
reflect exactly the relationship you want defined. |
Tip
Many project managers leave
Autolink disabled because it makes changes without asking for approval.
Sometimes they do not notice an unintended change in the linking for
their task lists—a problem you should take care to avoid. |
